Robot lawn mowers have much less servicing and maintenance requirements than conventional lawnmowers. They are mechanically much more simple machines, with fewer parts likely to malfunction.
However, there are a number of important things that you can do to keep your robot lawn mower in perfect working order. These include regularly cleaning your machine, replacing the blades and battery at an appropriate time, and storing your robot lawn mower appropriately during the winter.
You may also wish to consider protecting your robot lawn mower from extreme weather at other times of the year. This article will discuss all the important aspects of servicing and maintenance of robot lawn mowers.
Cleaning
Cleaning your robot lawn mower regularly is important to prevent the buildup of grass clippings around the moving parts, such as the cutting mechanism and wheels. Build up of grass clippings over time can deteriorate cutting performance and mobility of your robot lawn mower. It could also potentially cause excessive wear on the machine, shortening the lifespan of the parts.
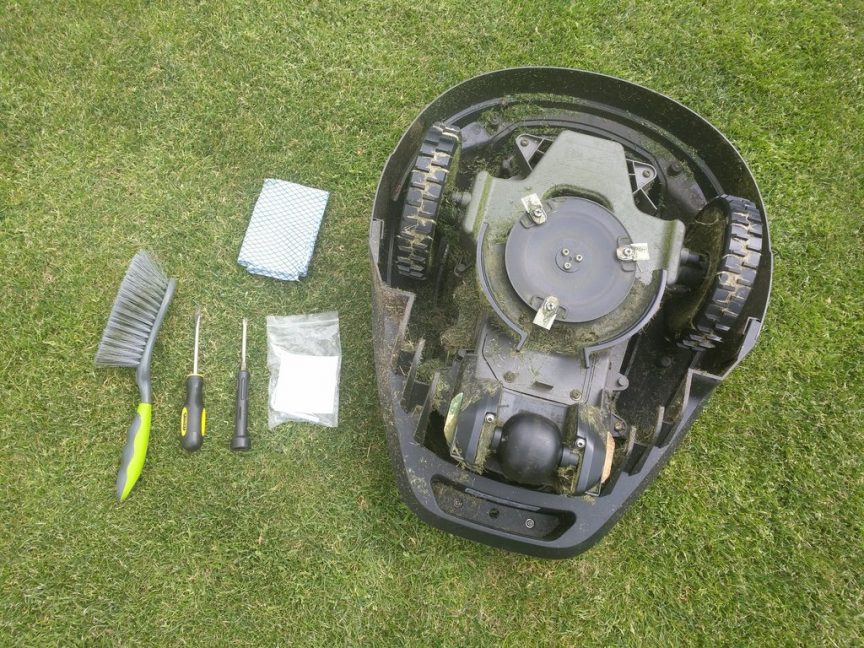
Cleaning a robot lawn mower is a very simple task and you do not need any specialised tools. I would recommend using only a coarse bristled, handheld brush and a damp cloth. I would also recommend either wearing protective gloves or removing the blades of the robot lawn mower prior to cleaning it.
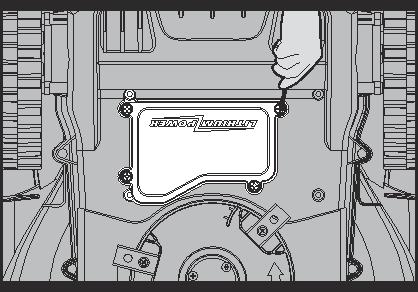
The first thing to do to clean a robot lawn mower is to turn off the master switch. This should be located either under the control panel access hatch, at the back
The exact location will vary between models, but the reason for switching this off is to prevent the cutting blades from unexpectedly switching on while the machine is being cleaned. Once the machine has been turned off, you should turn it upside down and place it on a soft, clean surface. I normally clean my machine outside on the grass.
The next step is to use the coarse bristled, handheld brush to clean the visible grass clippings off the underside of the robot lawn mower. Clippings will gather most significantly around the wheels and cutting mechanism, so ensure to give this close attention. You may need to use your fingers to reach under the wheels or into hard to access areas.
A coarse brush should be able to remove the majority of the grass clippings. However, there are two other optional pieces of equipment which you may find useful to help you clean all of the grass clippings from the robot lawn mower.
Firstly, a vacuum cleaner with a narrow nozzle may be useful to suck grass clippings out of difficult to reach areas. Alternatively, a can of compressed air could be used to blow clippings out of hard to reach areas.
Sometimes, the clippings can become quite impacted on the treads of the wheels, particularly in dry conditions. In this scenario, a coarse brush may not be strong enough to dislodge all of the clippings. If this happens, I tend to use a flat bladed screwdriver to dislodge any remaining clippings.
Once you have cleaned and dislodged the vast majority of the visible grass clippings and dirt, you should turn your robot lawn mower back over to allow the dislodged clippings to fall out of the chassis of the robot lawn mower. Once this is done, turn the robot lawn mower over again and you can start cleaning the chassis with a damp cloth.
Dirt and grass stains will accumulate around the underside of the chassis, around the cutting mechanism and on the inner aspect of the outer shell. You should be able to clean these off fairly easily with a damp cloth, leaving the underside of your robot lawn mower looking clean and free of any dirt.
Once you have finished cleaning the underside of the robot lawn mower, you should turn it back onto its wheels. You can then use a damp cloth to wipe the external surface of the robot lawn mower. You can also open the access hatch to the control panel and give this a wipe also.
Replacing The Blades Of A Robot Lawn Mower
The blades of your robot lawn mower will need changed from time to time. The frequency that they will need changed will depend on the individual robot lawn mower model that you have. Robot lawn mowers can broadly be divided into two categories.
Firstly, there are robot lawn mowers with freely rotating razor blades, which are mounted to a rotating disc. These tend to be much smaller blades and will need changed quite frequently, approximately every 8 weeks. The reason these blades need changed so frequently, is that robot lawn mowers rely on having sharp blades which cut the individual blades of grass cleanly, rather than just knocking the tops off the grass.
The second type of cutting blade is the solid, individually mounted blades of Robomow, ambrogio and John Deere robot lawn mowers. These models tend to have higher power cutting systems and the blades are much larger, more sturdy, and remain sharp for longer. It is likely that you will only need to replace the blades of these models approximately once per season. The blades of these models are typically more expensive, but the overall cost is much the same due to the decreased frequency of changing them.
In the section below, I have provided more information about how to change the blades of the various models of robot lawn mower.
Changing Freely Rotating Blades
This applies to Husqvarna, Gardena, McCulloch, Worx and Honda robot lawn mower models.
The process for replacing this type of blade is very simple and only takes a few minutes. You should wear protective gloves throughout this process, as the blades can be very sharp and there is a risk of injury if you do not take appropriate precautions.
1. Put on your protective gloves.
2. Turn the robot lawn mower off by pushing the master power switch. This will cut the power to the blades and eliminate the risk of the blades turning on during the changing process
3. Turn the robot lawn mower onto it’s back and place it on a soft, clean surface. I normally put the robot lawn mower on the grass, as this will protect the case of the robot lawn mower from getting scratched and will avoid making a mess elsewhere if there are grass clippings stuck to the underside of the robot lawn mower.
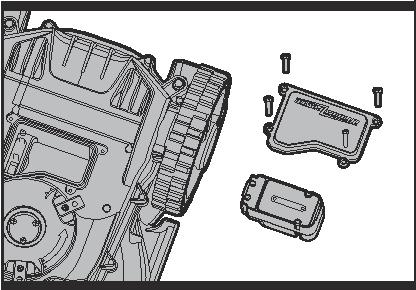
4. Use a Philips head screwdriver to loosen each of the screws that are holding each blade. I would recommend using one hand to immobilise the rotating disc to which the blades are screwed. This will make the process of unscrewing the blades much easier.
5. Discard both the blade and screw from each mounting point. Remember that the old blades can still be very sharp and should be disposed of in a responsible manner to avoid injury to anyone handling your waste.
6. Clean the mounting point for each blade so that there is no dirt or grass clippings around where you are going to mount the new blade. The blades need to be able to rotate freely, and any excess debris will impair this.
7. Take a new screw and blade from the packet. Align the screw hole in the new blade with the mounting point on the rotating disc. Insert a new screw and tighten this with your screwdriver.
8. Tighten the screw until it meets resistance, but do not over tighten it. This may impair the ability of the blade to rotate freely. In reality, the screws are designed to make it easy to ensure that the blade will rotate freely after it has been installed, so this process is very simple.
9. Once each of the new blades has been installed, ensure that the blades are all turning freely. Remember to turn the power button back on and then turn the robot lawn mower over so that it is correct way up again. Now you’re ready to go.
Changing Solid Blades
This applies to models from Robomow, Ambrogio and John Deere. The process for replacing the blades of models with solid, individual blades is a little different, but no more difficult.
Models from Ambrogio typically use four screws to mount the single blade to the underside of the chassis of the robot lawn mower. The following video explains the process very nicely.
Models from Robomow use a
Try to put this somewhere safe as you will need it each time you change the blades. If for any reason, your blade replacement tool is lost, you can purchase a replacement easily. Watch the following video to see exactly how to change the blades of a Robomow robot lawn mower.
Battery Maintenance And Replacement
The vast majority of robot lawnmowers use lithium ion batteries. Only the very basic models of Robomow robot lawn mowers use the older technology of lead acid batteries. I would strongly recommend opting for a model that uses a lithium ion battery, rather than a lead acid battery.
Lead acid batteries are cheaper, and this is a good mechanism by which Robomow is able to offer an excellent robot lawn mower at a very competitive price. However, lead acid batteries have significant drawbacks, such as dramatically longer charging times, heavier weight, and much lower power density.
Lithium ion batteries generally require no maintenance at all. However, they do have a limited lifespan. On average, a lithium ion battery will last for between 2 and 3 years, or for between 300 to 500 charging cycles, whichever occurs first.
The number of charging cycles that your robot lawn mower undergoes will depend on the size of your lawn in relation to the mowing capacity of your robot lawn mower. It will also depend on the scheduling that you have set for your robot lawnmower. A robot lawn mower that is programmed to run 7 days per week will require a replacement lithium ion battery sooner than a robot lawn mower that is programmed to work on only two or three days per week.
You may wish to consider a balanced approach between keeping your lawn looking freshly mowed all the time, and having to replace the battery more frequently than necessary.
Generally, you should consider replacing the battery of your robot lawn mower once the cutting time reduces to less than 80% of the original run time, or if the battery charging time increases significantly.
It is important not to store a lithium ion battery at extreme temperatures due to the impact that this can have on the operating ability and service life of the battery. A lithium ion battery which is operated at an average temperature of 30°C will have it’s service life reduced by 20%. At 40°C, the service life is reduced by up to 40%.
This has significant relevance for people operating robot lawn mowers in warmer countries. Even in more temperate climates, a robot lawn mower which has a charging station in direct sunlight, can spend a lot of time above the ideal storage temperature. This may be a reason to consider purchasing or building a shelter for your robot lawn mower.
The performance of all lithium ion batteries drops significantly when temperatures are low. When the temperature drops to 0°C, the discharging capacity of a lithium ion battery is reduced by approximately 20% compared to one operating at 20°C
Replacing A Robot Lawn Mower Battery
The process of replacing the battery of a Robot Lawn Mower is very simple. Models from Husqvarna, McCulloch, Gardena and Flymo have very similar battery replacement procedures. The following video outlines this very well.
Models from Robomow have the battery mounted at the back of the mower and require you to remove the wheels to remove and replace the battery. This is very easy to do and is outlined in the following video.
The replacement of the battery in Worx Landroid robot lawn mowers is quite similar to the process for Husqvarna based models. It simply requires you to turn the robot lawn mower upside down, loosen the four screws on the battery compartment cover, and then remove the battery cover.
You can then pull the battery out and the new battery can be directly inserted into the vacant battery slot. The battery panel can then be replaced and secured with the four screws.
Do I Need To Have A Robot Lawn Mower Professionally Serviced?
For the vast majority of people, I do not see value in paying to have your robot lawn mower professionally serviced. As the mechanical parts of a robot lawn mower are relatively simple, they can be cleaned and maintained by anyone, regardless of skill level. The parts that need replaced most commonly are the cutting blades and batteries and as you have seen above, these are very simple to replace.
However, high-end robot lawn mowers, that are capable of cutting a large area of grass, are quite expensive machines. it certainly would not be unreasonable to have an expensive model serviced every 1 to 2 years to ensure that the working life of the robot lawn mower is optimised.
For people with smaller gardens, and who have opted for a robot lawn mower which can handle a smaller volume of grass, the initial cost will have been substantially lower. In these circumstances, the cost of having a robot lawn mower serviced would not be good value for money in my opinion. You would be much better to simply follow the simple cleaning and maintenance advice in this article and in the manufacturers manual. This will avoid any significant issues and save you money over the long term.
How To Care For Your Robot Lawn Mower In Extreme Weather
Robot lawn mowers are suitable for use in most weather. They are water and windproof and normal weather conditions will not adversely impact their functioning. However, extremes of heat, cold, precipitation and wind may require you to take action to protect your robot lawn mower.
Heat
As mentioned previously, extreme heat can have a negative impact on the lifespan and functioning of the battery of your robot lawn mower. Direct sunlight can also cause discolouration and damage to the external shell of the robot lawn mower. You can reduce this by placing the charging station in a shady area to reduce the direct sunlight that the robot lawn mower is exposed to.
You could also consider constructing or purchasing a robot lawn mower garage or shelter to protect your machine from direct sunlight and the extremes of heat. I have written an article about robot lawnmower garages which you may find of interest.
Cold
Grass generally only starts growing once the temperature rises above 10°C. Therefore, in the autumn when the temperature drops to below 10°C on a consistent basis, you can bring your robot lawn mower into a winter storage area. In the springtime, when the temperature rises to above 10°C on a consistent basis, you can bring the robot lawn mower out again to begin cutting the grass as it starts to grow.
Wind
Robot lawn mowers are fairly heavy pieces of equipment, with even small models weighing at least 5 to 6 kilos, and high-end models weighing considerably more. However, in the event of a storm or very high winds, there is a risk of your robot lawn mower being blown by the wind when it is in operation or when it is docked with its charging station.
In addition, very high winds may cause flying debris to hit your robot lawn mower and cause damage to it. For this reason, I would advise lifting your robot lawn mower into a sheltered area on a temporary basis whenever gale force winds are forecast.
Rain
The same procedure for wind should apply to heavy rain. Robot lawn mowers are waterproof and normal levels of rainfall will not impact the function of these machines. In the event of torrential rain which could cause flooding, you don’t want to see your robot lawn mower floating down the garden. For this reason, I would also advise lifting your robot lawn mower into a sheltered and dry location if torrential rain is forecast.
Winter Maintenance and Storage
Before storing your robot lawn mower for the winter, there are a few simple things you should do to ensure that it is in the best possible condition when it is time to start mowing your lawn again in the spring.
1. Fully charge the battery before bringing it into your winter storage area.
2. Thoroughly clean the robot lawn mower, removing all dirt and grass clippings.
3. Turn the main power switch to the off position.
4. Lithium Ion batteries will very slowly discharge when they are being stored. It is important to ensure that a lithium battery is not stored in a discharged state. For this reason, it is advisable to charge the battery at some point during winter storage to ensure that the battery does not discharge fully.
5. Store your robot lawn mower in a dry location, ideally at a temperature of between 5°C and 20°C.
That should be all the information you need to ensure that your robot lawn mower stays in optimal condition and lasts for a long time without any issues. Please refer to the manual for your individual robot lawn mower for further guidance and specific instructions.